Whimsical Froggy Cake
by Christina Noellsch
(Lombard, IL)
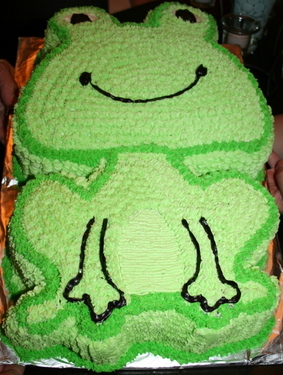
I wanted to make a frog cake for my son's first birthday. I had decided on a frog because of my love for lime green. I tried to find a frog cake pan to no avail, so I decided I would have to carve one. I found a frog I loved on one of his outfits and drew a large two piece template free hand onto paper cut to the size of a 9x13 pan.
I was originally going to do a single layer of cake for each the body and the head, but worried that once I cut the shape out I would not have enough cake to feed all 15 of us. So I decided to have a two layer cake, so a total of 4 9x13in cakes.
I made the head a yellow cake and the body a chocolate cake because I new that our group was going to be split down the middle. I made the cakes from Betty Crocker cake mixes, the cake was very most and delicious however, because it was so moist it was very difficult to work with. The next time I make a cake like this I will need to find a more solid cake to work with. In the end you would never know that I had trouble with the cakes, as icing covers all.
Once I had spread icing between the layers I laid my template on top to cut around with a large serrated bread knife. The eyes were the corner pieces of the head moved and rounded out, I adhered them with icing. Because the eyes were corner pieces and therefore thinner than the middle of the cake, I had to increase the amount of icing between the layers to raise the height.
Once the cake was carved I covered the top and sides with a thin crumb coat of buttercream icing. I used the Wilton vanilla buttercream icing recipe found on their website. For the entire cake, I used 6 batches of the icing recipe. The filling and crumb coat used 3 1/2 batches of icing, the extra 1/2 I saved in the fridge for use later in the project.
With the crumb coat done I then made a double batch of icing. I added green and yellow food coloring GELL until I got the bright green I was looking for. I
For the eyes I pressed a light circle with a round measuring tablespoon. I filled a pastry bag and started with a small round tip do do the belly. I then switched to a star tip and began along the inside of the border line I had drawn. I worked around the shaped as apposed to going back and forth in a line.
Once the whole top was complete with the light green icing, I moved to the sides of the cake. Starting in the space between the head of the frog and the body I worked my way out as to not mar anything that had green icing. I made my stars in a line straight up working from bottom to top. I did this around the entire cake.
When I was complete with the light green I moved on to the dark green outline. I pulled the left over icing from earlier out of the fridge, rewhipped it, and added green, yellow, and a little blue until I had a darker shade of green that was more yellow than blue.
I then piped the stars for the border adjusting the size of the star to accommodate the slight variation in the amount of white space to fill. After doing the border I then piped one row of stars at the bottom where the cake met the foiled board.
When I had completed the dark green on the frog it was time for the finishing touches. I knew I would not be able to easily make black icing so I bought a can of pre-dyed decorators icing, the kind that has the tips that fit on the end. Because it is difficult to control the can of icing I squirted the icing from the can into a pastry bag. I first piped the outline for legs and toes and then did the smile. For the eyes I left the smooth white of the crumb coat showing and then drew an oblong iris and filled it in.
And presto! the frog cake is complete. It was time consuming but so well worth it! Everyone loved it.
Dart Frogs Invitations (8)
Comments for Whimsical Froggy Cake
|
||
|
||
|
||
|
||
|
||
|
Click here to add your own comments Join in and write your own page! It's easy to do. How? Simply click here to return to Frog Cake. |
Must See Pages for this Month!
- Most Amazing Cakes Gallery
- Seasonal Cakes
- Unique Cakes
- Kids Cakes And Don't Forget...
- Our Home Page - Start Here!

