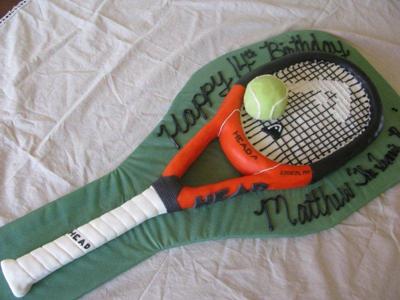
Tennis Racquet and Ball Cake
by Gail Taylor
(Halifax, Nova Scotia)
To make this tennis racquet and ball cake:
I made this cake with a 9x13 homemade chocolate cake and two extra small loaf pans with white cakes. I like to do both types so everyone can enjoy the cake, regardless of their flavor preference.
I used a real tennis racquet to get the shape of the cake and the head.com web site to get accurate photos of a specific tennis racquet I was trying to replicate.
I cut the 9x13 cake to the same size as the round part of the racquet, then shaped the handle out of the two loaf pan cakes.
The cakes in the loaf pans formed quite a rounded top while cooking, so I cut those off to make the cake flat, but they also provided the V shape where the handle connects onto the round part of the racquet. I attached them using frosting and put the bottom facing the outside, so the natural curve helped the two pieces to fit right in. Oh yes, freezing the pieces is a definite must, so they don't fall apart when handling them during frosting and attaching them.
I also layered the whole cake, with a butter cream frosting between the layers.
Once all this was complete, I started 'carving' the cake. This is very crucial, as it is was gives the cake it's realistic look. Otherwise it is just looks like someone tried to frost a cake to look like a tennis racquet. You don't want people to just think, 'Oh that is supposed to be a tennis racquet' you want them to say "Oh wow, a tennis racquet ... is that a cake?" So be sure to carve it really well. If you find you don't have an eye for this, just keep in mind, cut off all sharp corners and edges. Be sure to cut out all around the bottom edge, so the cake curves under, and do the top to match. Again, this is all easier if the cake had been frozen when you first start to work with it.
Once the carving is done, you then cover it with a butter cream
After this is done, I put on my orange fondant. I use my own made marshmallow fondant. I then did all the white, then all the black.
On the handle I used the back side edge of a butterknife to make the tape lines on the handle.
For the lettering "HEAD" I hand cut out the letters from the black fondant, and pasted them on with water. For the other lettering I used the Wilton Foodwriter markers and for the "Happy Birthday" part I used black decorator icing (the kind that turns hard in about 5-10 minutes).
To do the strings on the racquet, I first put all the white dots around the edge to 'attach' the strings to the raquet. I did this with white butter cream. Then I cut out a sketch I drew of the Head logo, and placed it on the cake, on top of the white fondant.
I then started putting on the black strings, with decorator icing. I went right over the piece of logo paper. Then when I was finished, I lifted the paper VERY carefully, and used white decorator icing to finish off the strings where the paper had been. This made a perfect logo, just as it appeared on the actual racquet.
To do the little string tightener (the little black logo on the strings) I just used the decorator icing, and waited until the black was dry before putting the white part on.
The Ball:
I used a small stainless steel dipper to bake the cake for this. I froze it first, before carving it. It was quite easy to carve. I then covered it with butter cream. I used a light yellow/green fondant to cover it. I cut out the 2 'figure 8' shaped pieces by estimating the size. They were over sized, the first time, so just trimmed them down a bit, until they were right.
I then put them on the ball, and put in the white lines between the two pieces using butter cream. It was a perfect ball, you could actually roll it!
Comments for Tennis Racquet and Ball Cake
|
||
|
||
|
||
|
||
|
||
|
||
Must See Pages for this Month!
- Most Amazing Cakes Gallery
- Seasonal Cakes
- Unique Cakes
- Kids Cakes And Don't Forget...
- Our Home Page - Start Here!

