Square Simple Yet Gorgeous Wedding Cake
by Shawndra Manning
(Litchfield Park, AZ, USA)
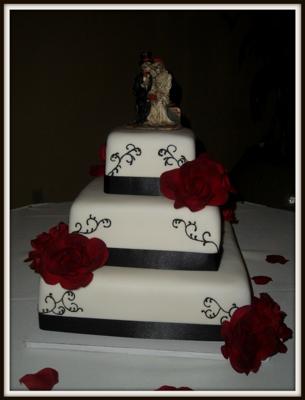
This wedding cake is pretty easy to make and turns out beautiful! For anyone wanting to make a wedding cake, that maybe doesn't have a whole lot of experience, but wants to impress, this is for you!
This cake is all Red Velvet with cream cheese filling! I baked 6 inch, 10 inch and 14 inch tiers, 2 layers of each. Filled with cream cheese filling and dirty iced each tier. The largest, 14 inch tier I iced on a 16 inch cake drum. The 6 and 10 inch tiers I iced on 8 inch and 12 inch square cake boards.
I purchased 2 large boxes of the Wilton fondant. I used one whole box (2 pkgs in the box) for the 14 inch tier. Roll out and cover the largest tier. I stuck it in the fridge to harden.
I then took a half of a box of fondant (1 pkg) and rolled that out and covered the 10 inch tier, stick in the fridge. Then took the other package and used that to cover the 6 inch tier and stuck in the fridge.
By now, the 14 inch tier is pretty firm from sitting in the fridge. I took it out and placed a 10 inch square pan on top and centered it. Poke small holes with a toothpick around the pan so you can use this as a guide when placing the next tier on top.
I took 6 inch lollypop sticks and cut to the exact height of the cake, inserted 8 of them into the top to hold up the middle tier. Put some buttercream icing (very small amount) on
Take your 10 inch tier (may need to trim the cake board it's sitting on if it hangs over where the fondant is. You don't want to see it at all). Place on top using the holes you poked as a guide. I always use a ruler on each side to ensure it's the same all the way around and exactly centered.
Repeat the above steps to add the top tier.
I stuck back in the fridge for an hour to firm everything up.
I used a 1 1/2 inch black satin ribbon. So, I measured 1 1/2 inches up and poked a small hole in each corner of all 3 tiers to know where to start my piping.
Using black buttercream icing and a tip 3 I piped the scroll work on each corner. This is the tricky part! Any type of scroll piping will work. I chose to do a different design on each tier. The hard part is trying to get it symmetrical. Mine wasn't perfect, but you couldn't really tell.
After the piping I attached my black ribbon. Starting at the back insert a corsage pin to keep in place. String the ribbon around the base of the tier and cut at the back. Insert 2 more corsage pins to hold. I used black so you couldn't even see them.
I then took artificial roses purchased from a craft store and cut with a wire cutter about an inch down. Just push them into the cake. I placed them randomly.
The topper was a love never dies skeletons. Purchased online
Comments for Square Simple Yet Gorgeous Wedding Cake
|
||
|
||
|
||
|
||
|
Click here to add your own comments Return to November 2011 Cake Decorating Contest Submission Form. |
Must See Pages for this Month!
- Most Amazing Cakes Gallery
- Seasonal Cakes
- Unique Cakes
- Kids Cakes And Don't Forget...
- Our Home Page - Start Here!
| Share this page: | ||





Would you prefer to share this page with others by linking to it?