Princess Esha Cake
by Fatima Sayed
(South Africa, Midrand)
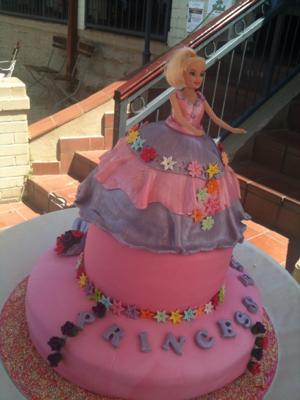
I was asked to make a unique cake for a very special little girl turning one. I am nervous when making tiered cakes but for this little princess I had to pull out all stops.
The bottom cake was made with x4 round 35 inch rich chocolate cakes. Once cooled I placed them in the freezer to harden for easier handling (approximately 2 hours). It is preferable to place the cake on an adequately sized piece of wax wrap paper for easy icing and transfer when ready.
When ready, using a serrated bread knife I leveled each one to the same size (still 35 inches. I used a thick layer of buttercream (using a piping bag)around each layer and filled jam in the center with a sliced layer of strawberries and sprinkles of sugar. All 4 layers had this filling between each layer.
When the 4th layer was placed on the top, I used buttercream to cover the cake with a basic thin crumb coat (this allows the first coat of buttercream to seal in the crumbs. Placed this in the Freezer to set for an hour.
After setting another thicker coat of buttercream was put on and smoothed with a heated spatula (dipped the spatula in a boil of boiling water, wipe dry with a clean cloth and gently run along/over the icing to smooth). Placed back into the freezer to set and chill.
Fondant (plastic Icing)
I use gel colors with my fondant. I mixed the relevant colours the night before in order to save time. Using a flat smooth surface to roll out the fondant.
Before I used icing powder on the table and rolling pin to avoind sticking. But I find that icing powder creates a dullness on the coloured fondant.
Now I use corn flour instead. does the same job and doesn't mess with the colour of the fondant. Rolled out the fondant (preferably thick....this helps when placing on the cake for the edges and doesn't crack after a few hours) and placed over the cake (measured the cake making sure that the fondant was big enough to go over the cake, cover the sides confortably and still had a few inches more). I cut away the access and used curved end of the spatula the tuck the icing under the cake to neaten and finish.
The second layer:
Size: 20 inch x 3 vanilla flavored cakes
Process: Same as above
SWAGS (Drapes):
Rolled out thick piece of fondant. Cut out 2 x required length of rectangles. Using the Dowels I created 3 x folds in each rectangle creating a drape effect.
First swag was placed on the top round layer draping down to the bottom layer of cake.
The second swag began where the first swag ended and ran to the bottom of the cake and onto a bit of the cake board.
Pink and purple roses placed in clusters at the beginning and end of the second swag (to cover the ends)
Doll Cake:
Here I used a deep oven proof glass bowl which takes the shape of the dress once turned upside down (should you have an oven proof bowl but not with the depth required, you may use the bowl you have. Cut it into 3 layers and use thick buttercream between the layers.
I cut/trimmed the top of the cake to make it as level as possible and then turned it over onto a large piece of wax paper (where the bottom bowl shape is now facing the top). When the cake was iced and chilled like the first 2 cakes, Icing - Same method as the round cakes.
Once the icing was chilled, I rolled out my first layer of icing for the dress. Using a sharp knife or pizza cutter I gave the edges a wavy effect. I then used one end of a thick round dowel (similar to a toothpick)and rolled each wave thinning and stretching the edges of the waves. This was gently placed over the domed shaped cake.
Using a kebab skewer/dowel I gently lifted the icing where required and using the skewer/dowel, created folds for the bottom of the dress to create a realistic effect.
The second layer of icing for the dress was cut out smaller than the first layer. Frilled the edges same as the first layer and carefully placed level over, setting the folds in place.
The third layer was cut smaller than the second. This one was left plain (no frilled edges).
I cut small round circles in clusters of 3 along the edges to create an embroidered effect and placed this final layer of icing equally over the second and gently rubbed it to settle into the folds of the second layer.
Took a Barbie and removed the legs. Places cling wrap around the bottom piece of the body.
Using a serrated knife I cut a hole at the top end of the cake and gently fitted the dolls body into it. Cut a piece of fondant for the bodice, wrapped around the front and sealed at the back.
I made a zipper effect to cover the seal and created a patterned effect with with different colored icing and giving her straps over her shoulder blades. Flowers were placed between each circle cluster and down the front end of the dress.
Finishing Touches:
I then took edible pearl glitter and mixed it in some cooking oil. Using a paint brush I painted the entire dress with this giving it a "BLLING" effect.
I did the same with the drapes on the round cakes and the letters which spelled out "Princess Esha". This helped to blend it all together.
CAKE BOARD:
I colored buttercream icing in a soft pink color to match the cake and covered the cake board with it. Then evenly sprinkled a thick layer of hundreds and thousands over this.
The first round layer was placed centrally onto the boards. A table spoon of thick icing was placed on the top center of the cake. 4 Dowels were poked into the center.
The second round cake was pierced/pushed down over the dowels and secured in the center. I placed edible flowers around the base of the second layer to match/blend with the flowers on the dress.
The doll cake was kept separate and was placed on the second layer right up at the top at the party.
I had a lot of fun making this cake even though it proved to be quite a challenge : )
Comments for Princess Esha Cake
|
||
|
||
|
||
|
Click here to add your own comments Return to October 2011 Cake Decorating Contest Submission Form. |
Must See Pages for this Month!
- Most Amazing Cakes Gallery
- Seasonal Cakes
- Unique Cakes
- Kids Cakes And Don't Forget...
- Our Home Page - Start Here!

