My Little Pony
by Kim Stough
(Ashland, Alabama)
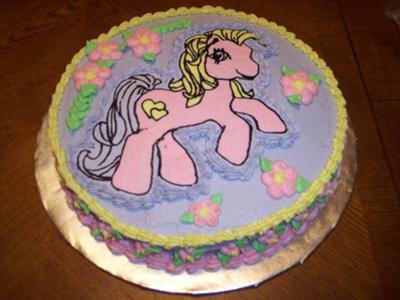
For this My Little Pony cake, I did a frozen butter cream transfer. For best results use a butter cream recipe that is at least 1/2 butter to Crisco. It peels off easier. I printed off a coloring page from the internet (there are thousands). I taped the picture to the back of a baking sheet and then taped a piece of wax paper over that.
I like to use a metal baking sheet because it gets really cold quicker. The outline needs to be done first. Think of it as layers. I use Wilton black in the tube using a #2 round tip. Start with the smaller details first.
When finished I put it in the deep freezer. Let it stay for at least 30 min. I then filled in the out line just like you are coloring in a coloring book using a #3 or #4 round tip.
When all is filled in I put a layer of icing on the back of the entire design and around the edges. Make sure the color of the backing is the same as what the cake will be Press down gently with small spatula to help push icing into small areas.
Place back in freezer until completely frozen (at least an hour). Remove transfer from baking sheet, peel off wax paper slowly, and place where desired on cake. The transfer will be a mirror image of the coloring page.
Put a boarder around transfer (star, shell, etc.) and decorate as you want. The great thing about this is that the transfer can be done in advance. Saves a lot of time!!!
Comments for My Little Pony
|
||
|
||
|
||
Must See Pages for this Month!
- Most Amazing Cakes Gallery
- Seasonal Cakes
- Unique Cakes
- Kids Cakes And Don't Forget...
- Our Home Page - Start Here!
| Share this page: | ||





Would you prefer to share this page with others by linking to it?