Cat Cake
by Gail Taylor
(Halifax, Nova Scotia)
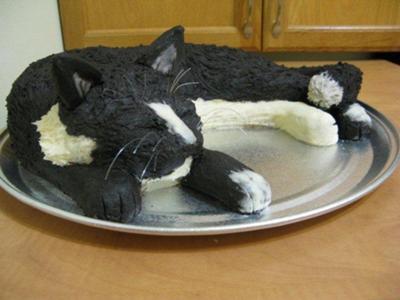
I made this cat cake out of two 9x13 homemade cakes. One chocolate and one white. I frosted it completely with butter cream only, two toothpicks (to support the ears) and I also used some fishing line for the cat's whiskers.
My main goal with this cake was to make it as most life like as possible. I didn't have a picture of the actual cat, but a verbal description of his coloring and patches to aid me. I did look for pictures of cats lying down on the internet and also used a picture of my sister's cat as my main resource.
I started with putting the cakes in the freezer, once frozen, I took them out covered the top of the white one, and put on a layer of butter cream frosting and then topped it with the chocolate cake.
Then I started the carving... this was made easier because the cakes were frozen. I made sure not to take off too much at a time. It's easier to take off pieces of cake, then to add more (although it can be done :)
I started with rounding off the back first. Then came up to the shoulders/neck area. I kept all the pieces I cut off, as they are to be used for the head, ears, tail, and legs/feet. You do need to have some artistic flare for this part. Or at least some imagination. It's hard to see the cat in its finished form, when you just have a bunch of pieces, but if you stick it out, it will eventually come together.
For the tail I used the part I had cut of when rounding the back. This would be one layer of the back right corner and sides of the cake. It also has to be carved to look like a tail. But before doing this, put it back in the freezer to firm up again. Do not actually attach the tail yet.
For the ears, I used two corners that I had cut off. They work perfectly. They are VERY delicate when you start working on them. You definitely need to use the freezing method on them. So bring them out, and return back to the freezer in between stages. I used a toothpick in each one to help support them, and to get them to stand up on the cake. Do not actually attach the ears yet.
For the feet/legs, I used odd and ends of what I had cut from the cake when making the body. You can 'glue' small pieces together with frosting if you need too. Remember to keep a close eye on your photo or model. This will help with the proportions and position of the cat.
For the head I used a corner again with the actual corner being the nose for the cat. There are lots of corners to use, as there are two layers. The corners tend to be a bit firmer to work
Once you have all this together, put it back into the freezer. This gives it time to firm up again, but it will also give you a chance to look at it with 'new eyes' when you take it out. Then you can see if something needs to be fixed. Maybe a little trim on the tail or a reposition of the feet etc.
Once you take the cake back out (leave ears and tail in freezer), scan it again for any carving touch ups it might need. Now it is ready to put on the first layer of butter cream. This can be done in any color. I prefer white. Once this is done, you can take the ears and tail out of the freezer and frost them. Do not attach them yet!
Once you have everything the way you like it, put it back in the freezer again! This will give you time to color your butter cream frosting black, but be sure to have some white set aside for the white patches. You can put these white patches where ever you like.
Take the cake out of the freezer, and start frosting it. I started with the white, and did the white belly, back leg, and foot, and white nose. The rest of the white, I added after the black frosting was put on, as it needed to be blended with the black (white in ears, on cheek/neck, tail, front foot, and small patch on back foot).
I used a clean small round paint brush (for acrylic paints)to 'brush' the frosting, after applying it, to give it the look of cat hair. I kept a clean piece of paper towel nearby to wipe of the brush when working on the blending the white patches with the black. Also, it is very important to work in smaller sections.
Because the cake was frozen, it will still be cold, and the butter cream will slowly turn hard, making it harder to 'brush' it. So do small sections at a time. To make the cats closed eyes, I used a butter knife to make the eyelid indents. Use small pieces of fishing line for whiskers, about 5 on each side will do.
While applying the black frosting you can do the ears and tail, and attach them when you are working on those sections.
Helpful tips: use nice thick buttercream frosting, it helps with building up the fluffy white part of the cheeks, and for making the frosting look like cat hair. Be sure to take advantage of the freezing method, it really helps with sculpting, and frosting (the buttercream doesn't melt).
Comments for Cat Cake
|
||
|
||
|
||
|
||
|
||
|
||
|
||
|
||
|
||
|
||
|
||
|
||
Must See Pages for this Month!
- Most Amazing Cakes Gallery
- Seasonal Cakes
- Unique Cakes
- Kids Cakes And Don't Forget...
- Our Home Page - Start Here!

